
Permissions Platform
The Permissions Platform allows Firm Administrators to set up policies so that only authorized users can make changes to each client's engagement. A policy is made up of a user group, role, and resource group. The permission policy determines which functional rights users have and which clients (resources) they can work with.
Getting Started with Permissions
As Firm Administrator you will need to setup permissions in both Permissions Platform and CCH Axcess Dashboard. This can be done by following the steps below:
-
Log in to Axcess Engagement
-
Click Settings
 in the top right-hand corner. The Permissions platform will open in a new tab.
 -
Select the appropriate permission policies:
-
Role - Select a default Role or create a new Role where at least one functional right is selected. Please refer to the "Roles" section to learn how to create a new role and select functional rights.
-
User Group - Open an existing User Group or create a new User Group and assign the applicable staff members. Please refer to the 'User Groups' section below to learn how to create a new user group and assign your staff to a user group.
-
Resource Group - Open an existing Resource Group or create a new Resource group and assign the applicable clients. Please refer to the 'Resource Groups' section below to create a new resource group and include clients to a resource group.
-
Policy - Select a default Policy or create a new Policy where the Role, User Group and Resource Group are assigned. Please refer to the 'Policies' section below to learn how to create a new policy.
-
-
Log in to the CCH Axcess Dashboard and choose Security Groups.
-
To allow staff to login to Axcess Engagement:
-
Select a Security Group.
-
Click on Functional rights
-
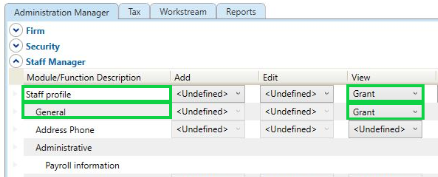
Under the ‘Administration Manager’ tab > Expand Staff Manager
-
Under the Staff profile module > Select Grant in the View column
-
Under the General function > Select Grant in the View column
-
-
To allow staff to view the clients in Axcess Engagement:
-
Select a Security Group
-
Click on Functional rights
-
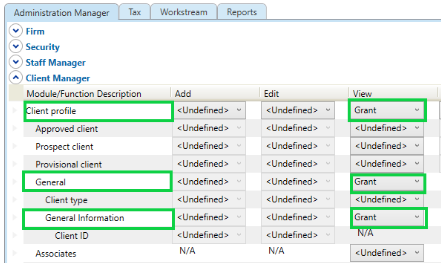
Under the ‘Administration Manager’ tab > Expand Client Manager
-
Under the Client profile module > Select Grant in the View column
-
Under the General Module > Select Grant in the View column
-
Under the General Information function > Select Grant in the View column
-
Axcess Engagement can be accessed by Firm Administrators and staff after these steps are completed.
Policies
The Permissions Platform allows Firm Administrators to set up policies so that only authorized users can make changes to each client's engagement.
Permission Policy
A policy is made up of a user group, role, and resource group. The permission policy determines which functional rights users have and which resources they can work with.
-
User Group: User groups are made up of your staff. When the user group is assigned to a permission policy, the staff in the group inherit the permissions from the role assigned to the permission policy and access to clients included in the resource group assigned to the policy.
-
Role: Roles define the functional permissions the members in the user group can perform.
-
Resource Group: Resource groups are your groups of clients. When the resource group is assigned to a permission policy, the staff in the user group assigned to the permission policy can work with these clients.
.png)
Default Policies
Firm Administrators can create policies or use one of the following default policies:
- Full Rights
- Super Modifier
- Super Viewer
- Roles Manager
- Policy Manager
- User Group Manager
- Resource Group Manager
Types of Policies
There are two types of permission policies:
Grant Policy
The grant policy specifies which user group should be granted functional permissions when they work with resources in a resource group.
Deny Policy
Deny policies specify which user group should be denied access to a resource group's resources for a particular role.
Create New Policy
To create a custom policy:
- Click Create Policy.
- Enter the policy name and description.
- Select policy type (e.g. Grant or Deny).
- Use drop down menus to select the appropriate user group, role, and resource group.
- Click Save once all fields are complete. A “Policy was created successfully” toast message should appear.
View or Edit Policies
You can view or edit a policy name, description, type, user group, role, and resource group by clicking on its name in the Policy tab.
Roles
Firm Administrators can create roles or use one of the following default roles:
- Full Rights*
- Super Modifier
- Super Viewer
- Roles Manager
- Policy Manager
- User Group Manager
- Resource Group Manager
- Preparer
- Reviewer
- Full Product*
List of Functional Permissions:
Firm administrators can grant or deny staff members access to perform the following actions in the application:
Engagement List:
-
Create new engagement
-
Roll forward engagement
-
Delete Engagement
-
Lock Engagement (Engagement Pro & Knowledge Coach)
-
Unlock Engagement (Engagement Pro & Knowledge Coach)
Workpapers:
-
Upload Workpaper
-
Upload new version of workpaper
-
Remove active user from workpaper
-
Lock workpaper (Engagement Pro)
-
Unlock workpaper (Engagement Pro)
-
Sign off workpaper as a preparer (Engagement Pro & Knowledge Coach)
-
Sign off workpaper as a reviewer (Engagement Pro & Knowledge Coach)
-
Send (Delete) to recycle bin
-
Restore workpaper from recycle bin
-
Permanently delete workpaper from recycle bin
Notes: (Engagement Pro & Knowledge Coach)
-
Add note
-
Set note to roll forward
-
Set other staff’s note to roll forward
-
Clear note
-
Clear other staff’s note
-
Delete note
-
Delete other staff’s note
-
Delete reply (of other staff)
Create New Role
To create a custom role:
-
Click Create Role.
-
Enter role name and description.
-
Under Functional Rights, select the functional permissions that are applicable to the role.
- Click Save.
View or Edit Role
To view or edit a role:
-
Click on the role name from the ‘Policy’ or the ‘Roles’ tab.
-
Edit the name, description and functional rights for each module.
Resource Groups
Firm Administrators can create Resource Groups or use this default group:
-
Admin – All
Create New Resource Groups
To create a custom resource group:
-
Click Create Resource Group.
-
Enter the name and description of the resource group.
-
Select client(s) to include in the resource group by their organizational unit.
The client may also be selected individually under ‘Other Clients.' Search for the required client by entering the name or email of the client in the search box. Click Search and the dropdown list will display all the client names matching the search criteria.
 -
Check Firm if you would like to include all clients in the Resource and all Office and Business Units will also be selected.
-
Click Save.
View or Edit Resource Group
To view or edit a resource group:
-
Click a resource group tile on the ‘Policy’ or the ‘Resource Groups’ tab.
-
Edit the name, description, and resources, as needed.
Add Clients to a Resource Group
-
Click on a resource group tile.
-
Click the expand arrow next to Other Clients.
-
Enter the client name or email in the search bar.
-
Click Search
. A list displays with client names matching the search criteria. -
Select a client.
-
Click Add.
View or Edit or Delete Existing Resources
In the table, you will see a list of existing resources, which include organizational units and/or clients.
-
View or Edit the Include/Exclude option by clicking on the button next to the existing organizational unit or client.
-
Click Delete checkbox next to the existing organizational unit or client.
-
Click Save.
User Groups
Create a New User Group
To create a new user group:
-
Click Create User Group.
-
Enter the name and description of the user group.
-
Select Firm or an Organizational Unit or Other Staff to include in the user group.
-
Click Save.
View or Edit User Group
To view or edit a user group:
-
Click on the User Group tile to edit the name or description of the user group.
-
Click View Edit Assigned Staff tab to change the organizational units or staff included in the user group.
-
Click Save.
| Default Policies | ||
| Full Rights | Policy to manage all administrative actions | |
| Super Modifier | Policy to manage edit actions on permissions configuration | |
| Super Viewer | Policy to manage view actions on permissions configuration | |
|
Roles Manager |
Policy to manage role configuration | |
| Policy Manager | Policy to manage policy configuration | |
| User Group Manager | Policy to manage user group configuration | |
| Resource Group Manager | Policy to manage resource group configuration | |
| Default Roles | ||
| Full Rights | Role to manage all administrative actions | |
| Super Modifier | Role to manage edit actions on permissions configuration | |
| Super Viewer | Role to manage view actions on permissions configuration | |
| Roles Manager | Role to manage role configuration | |
| Policy Manager | Role to manage policy configuration | |
| User Group Manager | Role to manage user group configuration | |
| Resource Group Manager | Role to manage resource group configuration | |
| Preparer | Permissions granted for a preparer role | |
| Reviewer | Permissions granted for a reviewer role | |
| Full Product | Role that grants all permissions for licensed applications, excluding permissions configuration | |
| Default User Groups | ||
| Full Rights | Limited to full rights administrative users | |
| Super Modifier | Users who are able to modify permissions configuration | |
| Super Viewer | Users who are able to view permissions configuration | |
| Roles Manager | Users who are able to manage roles | |
| Policy Manager | Users who are able to manage policies | |
| User Group Manager | Users who are able to manage user groups | |
| Resource Group Manager | Users who are able to manage resource groups | |
Default Resources Groups |
||
| Admin | All available resources | |